Module Federation로 Micro Front-End 구축 맛보기
서비스 규모가 커짐에 따라 Front-End에서도 MSA를 적용하는 곳이 점점 많아지고 있다. 빌드 통합, 런타임 통합 등 방법도 다양하고 직접 바닐라 스크립트로 구현하거나 single-spa 같은 라이브러리를 이용하는 곳도 있다. 그리고 이번에 Webpack 5 버전에서 MSA를 지원하는 Module Federation이라는 피쳐가 추가 되었다. Module Federation이 뭔지 살펴보고 직접 사용해보자.
Module Federation
Module Federation은 Webpack 5에 새로게 추가된 기능이다. Module Federation은 여러 분리된 빌드들로 하나의 어플리케이션을 구성할 수 있도록 해준다.
컴포넌트 또는 코드 단위로 빌드된 결과물을 단/양방향에서 공유하여 사용할 수 있다. 다른 빌드에 있는 코드를 동적으로 불러와서 사용할 수 있다. 개별 빌드는 서로 의존성이 없어서 개별적으로 개발하고 배포할 수 있다.
시작
Webpack 5 이전 버전은 별도로 플러그인을 설치해서 구현할 수 있지만 webpack 버전을 올린 후 적용하는걸 추천한다. 아래 순서대로 해볼 예정이다.
1. 프로젝트 세팅
2. Module Federation 및 remote/host 설정
3. Vuex 설정 및 스토어 공유
1. 프로젝트 세팅
총 3개 애플리케이션 모듈을 만들고 메인 모듈에서 메뉴, 장바구니 모듈을 remote 설정하여 구성해볼 예정
1-1) 프로젝트 구조
project
└─ app (메인 모듈)
└─ basket (장바구니 모듈)
└─ menu (메뉴 모듈)
1-2) 프로젝트 생성
먼저 프로젝트를 생성한다. 편의상 vue cli로 생성했고, webpack으로 직접 설정해도 된다.
최신 버전이 3이라 vue3로 설치하였다.
$ vue create app    -- 메인 모듈
$ vue create menu   -- 메뉴 모듈
$ vue create basket -- 장바구니 모듈
포트는 각각 8000(메인), 8001(메뉴), 8002(장바구니)로 설정했다.
// vue.config.js
devServer: {
    port: 8000, // 8001, 8002
},
1-3) app(메인) 모듈
app 모듈은 컨테이너 같은 역할을 한다. 메뉴 모듈과 장바구니 모듈을을 메인에 심을 예정이다. menu 영역에 메뉴 모듈을 넣을거고, basket 영역에는 장바구니 모듈을 넣을거다. 화면은 아래처럼 구성한다.
App.vue
<template>
  <div>
    <div>
      <div style="border: solid; border-color: red; width: 700px">
        <h1>Header</h1>
      </div>
    </div>

    <div style="display: flex; height: 300px">
      <div class="menu">menu</div>
      <div class="basket">basket</div>
    </div>
  </div>
</template>

<script>
import { defineComponent } from "vue";

export default defineComponent({
  name: "App",
});
</script>

<style>
.menu {
  border: solid;
  border-color: green;
  width: 500px;
  height: 100%;
}
.basket {
  border: solid;
  border-color: blue;
  width: 200px;
  height: 100%;
}
</style>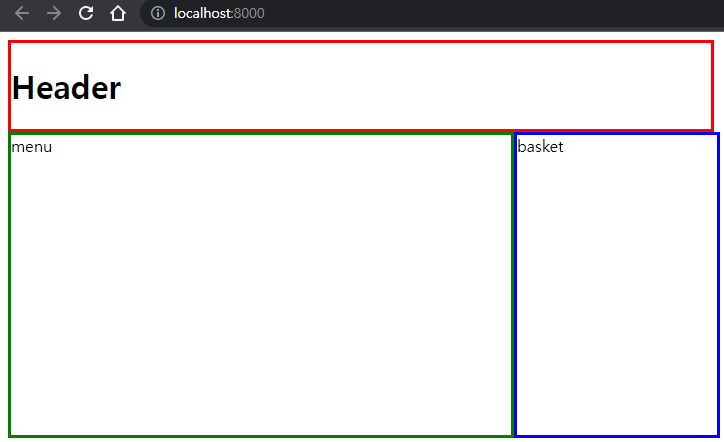
1-4) menu(메뉴) 모듈
menu 모듈은 메뉴를 제공하고 선택하는 역할을 한다. 화면은 아래처럼 구성한다.
Chicken.vue
<template>
  <div>
    <h2>메뉴</h2>
    <h3>치킨</h3>
    <ul>
      <li v-for="(menu, index) in menus" :key="index">
        {{ menu.name }} : {{ menu.price }}원
        <button>담기</button>
      </li>
    </ul>
  </div>
</template>

<script>
import { defineComponent, reactive } from "vue";

export default defineComponent({
  name: "Chicken",
  setup() {
    const menus = reactive([
      { name: "후라이드", price: 10000 },
      { name: "양념", price: 11000 },
      { name: "반반", price: 11000 },
    ]);

    return { menus };
  },
});
</script>
1-5) basket(장바구니) 모듈
basket모듈은 메뉴에서 담은 메뉴들을 출력하고 계산하는 역할을 한다. 화면은 이렇게 구성한다.
Basket.vue
<template>
  <div>
    <h2>장바구니</h2>
    <ul>
      <li>후라이드 : 10000원</li>
      <li>양념 : 11000원</li>
    </ul>
    <h3>총 : 21000원</h3>
  </div>
</template>

<script>
import { defineComponent } from "vue";

export default defineComponent({
  name: "Basket",
});
</script>
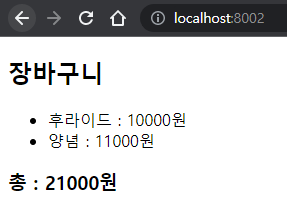
2. Module Federation 및 remote/host 설정
2-1) Module Federation 설정
각 모듈 틀을 짰으니 이제 Module Federation을 이용하여 컴포넌트를 공유해보자. 공유하는 애플리케이션을 remote라 부르고 이것들 사용하는 곳을 host라고 부르기로 한다. 여기서 app이 host이고 menu, basket 모듈이 remote이다.
먼저 host(app 모듈) 웹팩 설정을 해보자.
publicPath: "http://localhost:8000",
chainWebpack: (config) => {
  config.optimization.delete("splitChunks");
  config.plugin("module-federation-plugin").use(require("webpack").container.ModuleFederationPlugin, [
    {
      name: "main",
      remotes: {
        menu: "menu@http://localhost:8001/remoteEntry.js",
        basket: "basket@http://localhost:8002/remoteEntry.js",
      },
      shared: require("./package.json").dependencies,
    },
  ]);
},
- name : 현재 모듈명을 적어준다. 다른 애플리케이션과 중복을 피해야한다.
- remotes : 불러올 컨테이너의 경로이다.
- shared : 의존성 공유를 어떻게 할지 정의하는 설정이다. 현재 사용하는 라이브러리들을 공유하기로한다.
다음은 remote(menu, basket 모듈)의 웹팩 설정이다.
// menu
publicPath: "http://localhost:8001",
chainWebpack: (config) => {
  config.optimization.delete("splitChunks");
  config.plugin("module-federation-plugin").use(require("webpack").container.ModuleFederationPlugin, [
    {
      name: "menu",
      filename: "remoteEntry.js",
      exposes: {
        "./Chicken": "./src/components/Chicken.vue",
      },
      shared: require("./package.json").dependencies,
    },
  ]);
},

// basket
publicPath: "http://localhost:8002",
chainWebpack: (config) => {
  config.optimization.delete("splitChunks");
  config.plugin("module-federation-plugin").use(require("webpack").container.ModuleFederationPlugin, [
    {
      name: "basket",
      filename: "remoteEntry.js",
      exposes: {
        "./Basket": "./src/components/Basket.vue",
      },
      shared: require("./package.json").dependencies,
    },
  ]);
},
remote 설정을 하고나서 remoteEntry.js로 들어가보면 exposes한 컨테이너가 보이는걸 확인할 수 있다.
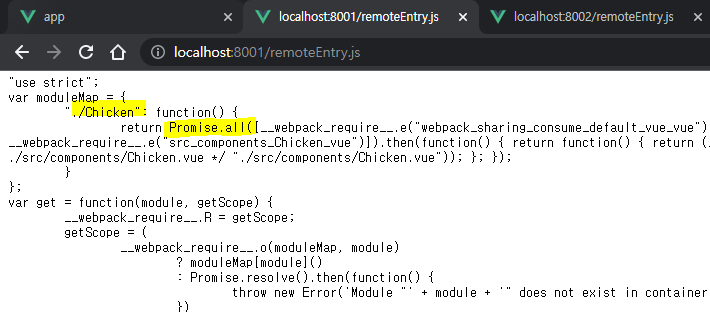
2-2) remote 컴포넌트 사용하기
module federation에서는 엔트리를 비동기로 가져오는 것을 추천하고있다. bootstrap.js를 생성하고 main.js에서 이 파일을 엔트리로 가져오게 변경한다.
// bootstrap.js
import { createApp } from "vue";
import App from "./App.vue";
createApp(App).mount("#app");

// main.js
import("./bootstrap");
그리고 remote가 떠있지 않을 수도 있기 때문에 defineAsyncComponent를 사용하여 컨테이너를 불러와서 사용한다.
<template>
  <div>
    <div>
      <div style="border: solid; border-color: red; width: 700px">
        <h1>Header</h1>
      </div>
    </div>

    <div style="display: flex; height: 300px">
      <div class="menu">
        menu
        <Chicken />
      </div>
      <div class="basket">
        basket
        <Basket />
      </div>
    </div>
  </div>
</template>

<script>
import { defineComponent, defineAsyncComponent } from "vue";

export default defineComponent({
  name: "App",
  components: {
    Chicken: defineAsyncComponent(() => import("menu/Chicken")),
    Basket: defineAsyncComponent(() => import("basket/Basket")),
  },
});
</script>
이제 아래처럼 메뉴와 장바구니 영역에 각 remote 컴포넌트들이 렌더된다.
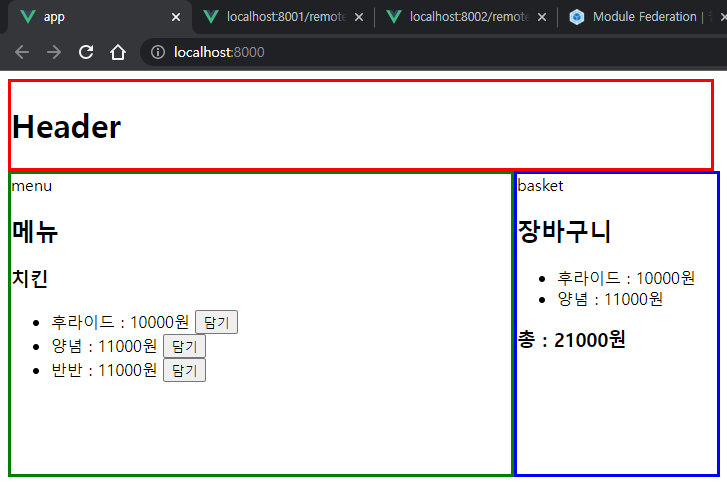
3. Vuex 설정 및 스토어 공유
모듈간 상태를 공유해보자. app 모듈에 상태를 정의하고 menu와 basket 모듈에서 상태를 공유하는 방식으로 해보자. (설계하기 나름인데 일단 간단한 방식으로 진행)
먼저 각 모듈에 vuex를 설치
yarn add vuex
app 모듈에 스토어 설정을 한다.
store/index.js
import { createStore } from "vuex";
import basket from "./modules/basket";

export default createStore({
  modules: {
    basket,
  },
});

export { basket };
공유하여 사용하기 편하도록 스토어를 모듈화하였다. (namespace는 패스)
store/modules/basket.js
export default {
  state: () => ({
    menus: [],
  }),
  mutations: {
    addMenu(state, value) {
      state.menus.push(value);
    },
  },
  getters: {
    menus(state) {
      return state.menus;
    },
    totalPrice(state) {
      return state.menus.reduce((sum, value) => sum + value.price, 0);
    },
  },
};
- menus : 장바구니에 담긴 메뉴들
- addMenus : 메뉴 추가
- totalPrice : 총 가격
bootstrap.js
import store from "./store";
createApp(App).use(store).mount("#app");
이제 스토어를 다른 모듈들에서 사용할 수 있도록 exposes 설정한다.
config.plugin("module-federation-plugin").use(require("webpack").container.ModuleFederationPlugin, [
  {
    name: "main",
    filename: "remoteEntry.js",
    remotes: {
      menu: "menu@http://localhost:8001/remoteEntry.js",
      basket: "basket@http://localhost:8002/remoteEntry.js",
    },
    exposes: {
      "./Store": "./src/store/modules/basket",
    },
    shared: require("./package.json").dependencies,
  },
]);
이제 각 모듈에서 이 스토어를 가져다가 사용하면된다. remotes에 app 모듈을 등록
remotes: {
  main: "main@http://localhost:8000/remoteEntry.js",
},
각 store/index.js에 remote의 Store 등록
import { createStore } from "vuex";
import basket from "main/Store";

export default createStore({
  modules: {
    basket,
  },
});
menu 모듈의 Chicken.vue 컴포넌트에는 장바구니 담기 addMenu를 붙이고
<template>
  <div>
    <h2>메뉴</h2>
    <h3>치킨</h3>
    <ul>
      <li v-for="(menu, index) in menus" :key="index">
        {{ menu.name }} : {{ menu.price }}원
        <button @click="addMenu(menu)">담기</button>
      </li>
    </ul>
  </div>
</template>

<script>
import { defineComponent, reactive } from "vue";
import { useStore } from "vuex";

export default defineComponent({
  name: "Chicken",
  setup() {
    const menus = reactive([
      { name: "후라이드", price: 10000 },
      { name: "양념", price: 11000 },
      { name: "반반", price: 11000 },
    ]);

    const store = useStore();
    const addMenu = ({ name, price }) => store.commit("addMenu", { name, price });

    return { menus, addMenu };
  },
});
</script>
basket 모듈의 Basket.vue 컴포넌트에서는 불러와서 출력을 한다.
<template>
  <div>
    <h2>장바구니</h2>
    <ul>
      <li v-for="(menu, index) in menus" :key="index">{{ menu.name }} : {{ menu.price }}</li>
    </ul>
    <h3>총 : {{ totalPrice }}</h3>
  </div>
</template>

<script>
import { defineComponent, computed } from "vue";
import { useStore } from "vuex";

export default defineComponent({
  name: "Basket",
  setup() {
    const store = useStore();
    const menus = computed(() => store.getters.menus);
    const totalPrice = computed(() => store.getters.totalPrice);

    return { menus, totalPrice };
  },
});
</script>
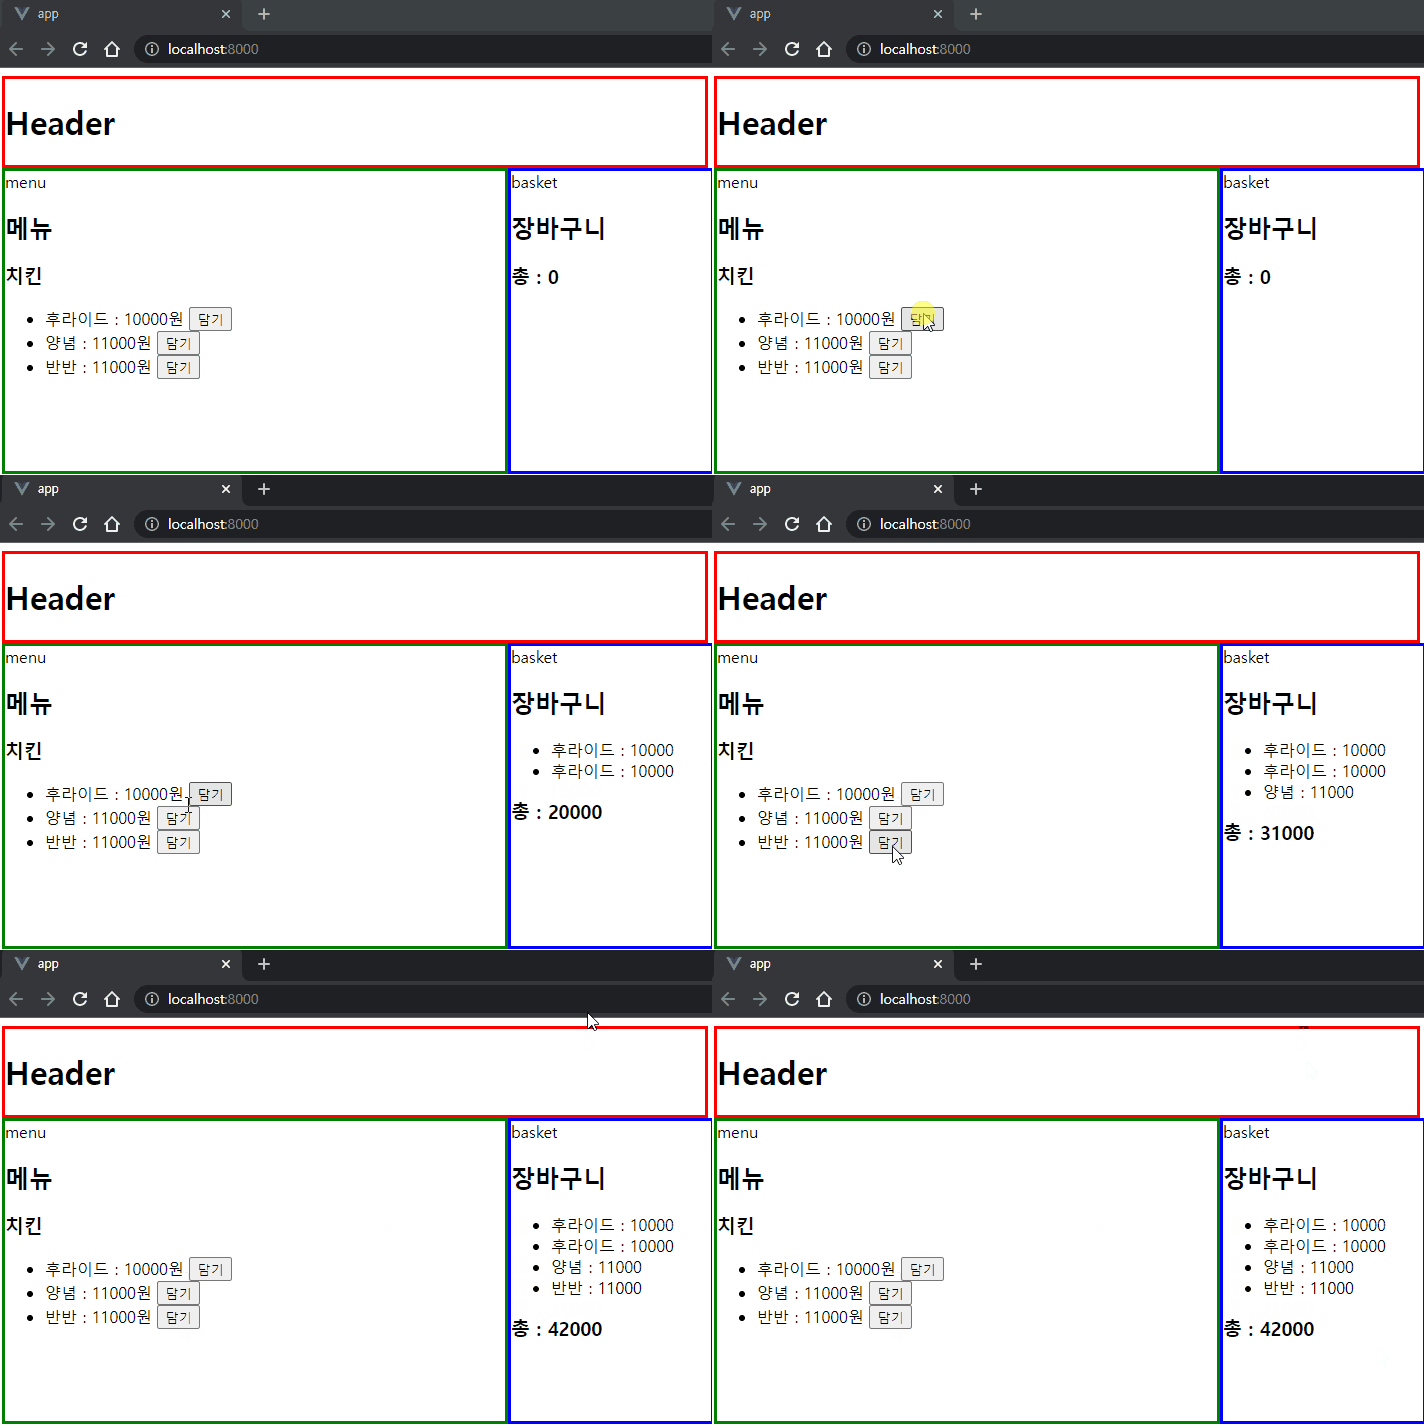
아래처럼 동작한다.
라우터 설정
라우터도 스토어와 마찬가지로 remotes에서 라우터를 공유해서 사용하면 된다.
참고
'개발' 카테고리의 다른 글
| 크록포드 스타일 자바스크립트 오브젝트 (Crokford Style Javascript Ojbect) (0) | 2022.09.07 |
|---|---|
| Nuxt + Express + Supabase 인증 (0) | 2022.09.03 |
| kubernates mysql(postgresql) 접속 (0) | 2022.03.05 |
| 파이썬, pymysql, mysql 이모티콘 \xF0\x9F\x98\x88 에러 (0) | 2022.03.03 |
| Nuxt 환경별 환경변수 구분하기 process.env (0) | 2022.02.27 |